Creating a Java-SE (Desktop) Application that uses Dependency Injection from Weld can be a very simple process. In this quick example, I use Maven and Weld-SE to create a very simple Dependency Injected application.
The technologies that we use in this tutorial are Dependency Injection, provided by
Weld, a
JSR-299 Implementation, and
Maven as our project builder.
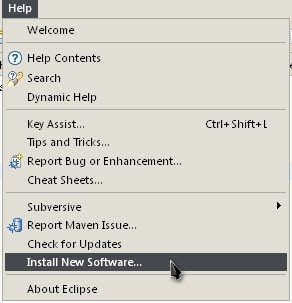
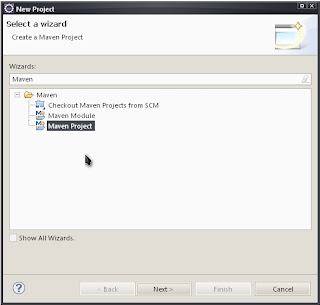
The first step to creating a Welded Desktop Application, is to create a Maven project from the maven-archetype-quickstart archetype. There are many ways to do this, one option is from the command line with "mvn archetype:generate". I prefer to use m2eclipse, a plugin for eclipse (see
Creating a Maven Project in Eclipse)
Ok, we have our Maven project. Now, let's add our dependencies to the pom.xml. Luckily, there's only one that is needed. The Weld-SE dependency:
    <dependency>
     <groupId>org.jboss.weld.se</groupId>
     <artifactId>weld-se-core</artifactId>
     <version>1.1.10.Final</version>
     <type>jar</type>
     <scope>compile</scope>
    </dependency>
Yay, we have everything we need to start writing our code now. Well, not quite. We need an "empty" beans.xml file. So we create one at src/main/resources/META-INF/beans.xml. This file contains very little, but is not technically empty. It contains the following:
<beans xmlns="http://java.sun.com/xml/ns/javaee"
      xmlns:xsi="http://www.w3.org/2001/XMLSchema-instance"
      xsi:schemaLocation="http://java.sun.com/xml/ns/javaee
      http://java.sun.com/xml/ns/javaee/beans_1_0.xsd">
</beans>
This file tells Weld that this application uses CDI (Context Dependency Injection). This is very important, otherwise, why would we be using Weld in the first place.
To make this post actually worthwhile, we'll make a class to be injected into our main code. It's going to be really simple, and not follow best practices at all.
package com.blogspot.aprogrammersguide.weldse;

public class InjectedClass {
 public String value = "Hello World!";
}
Let's play with some Weld now. We'll make our really simple main class. Our main class will use the annotation @Inject to shove an InjectedClass object into our main class.
public class Main {

 @Inject
 private InjectedClass injected;
}
That's pretty sweet, but this application still does nothing... there's not even a static void main... And, it doesn't need one, it does however need a different method.
...
    public void main(@Observes ContainerInitialized event)
    {
     System.out.println(injected.value);
    }
...
This is what Weld-SE expects. Basically, this tells Weld that main (or whatever else you wanted to name it) is watching for the "ContainerInitialized" event. The ContainerInitialized event is when Weld is done being initialized; this is when the application should start.
So, here's the full source of main. I like to give the full source, so you don't have to guess as to what you need to import.
package com.blogspot.aprogrammersguide.weldse;

import javax.enterprise.event.Observes;
import javax.inject.Inject;
import org.jboss.weld.environment.se.events.ContainerInitialized;

public class Main {

    @Inject private InjectedClass injected;

    public void main(@Observes ContainerInitialized event){
     System.out.println(injected.value);
    }
}
So, let's run this and see what we get. You might be asking, how do we run this? You told us that we don't need a static void main, but Java requires one. We'll use the one that the nice Weld developers provided us, org.jboss.weld.environment.se.StartMain.
So, to run this we'll go to the command prompt. Go to the root of your Maven project and run
mvn exec:java -Dexec.mainClass="org.jboss.weld.environment.se.StartMain"
And there we go. We have a Java-SE Application that uses Weld for Dependency Injection. Obviously though, you'll want to make this a Jar before deploying it, so just remember to use org.jboss.weld.environment.se.StartMain as the mainClass in your Jar, instead of the main class you developed. But wait, what about command-line parameters?
Weld-SE does have the capability to handle this. All you'll need to do is modify your main method. Change it to:
public void main(@Observes ContainerInitialized event, @Parameters List parameters)
and import org.jboss.weld.environment.se.bindings.Parameters. The parameters object will contain all the command-line parameters.
One last interesting side-note that comes from all this. You now have the ability to have multiple main methods in multiple classes by having other methods use the @Observes annotation with the ContainerInitiatized event. Weld does handle these, but it is quite a dangerous thing to do. Weld will execute one of these at a time. One will finish and then the next will start. If you want to prove it, add this class:
package com.blogspot.aprogrammersguide.weldse;

import java.util.List;
import javax.enterprise.event.Observes;
import org.jboss.weld.environment.se.bindings.Parameters;
import org.jboss.weld.environment.se.events.ContainerInitialized;

public class OtherMain {
    public void main(@Observes ContainerInitialized event, @Parameters List parameters)
    {
  for (int i = 0; i < 10; i++) {
   System.out.println("Other Main");
   try {Thread.sleep(1000);} catch (InterruptedException e) {}
  }
    }
}
One of these will execute first, and then the other, and I'm not sure if there is a way to predict which one will run first. If you add a similar for loop into your first main, you can see that one runs first, and then the other, not simultaneously.
Anyways, that's my post on Java-SE and Weld. hopefully it helps you out. For more information on Weld, visit the
Weld Site.
Update: Changed the Weld SE dependency to be something a bit more recent.


